Robotic Lawnmower Boundary Wire Splice Kit — Patch the Invisible Fence, FAST
Boundary Wire Splice Kit – a simple, weatherproof toolkit that covers the basics for quick boundary repairs, keeping your robotic mower running without interruptions.
Ever watched a robotic mower wander into flower beds because a buried boundary wire snapped? It’s the kind of small failure that causes big, annoying messes—chewed plants, clipped hoses, and a mysteriously failed mowing pattern that takes ages to diagnose.
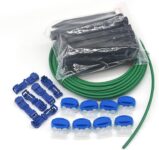
Homeowners who don’t want to fuss with soldering or full system replacements will find the Robotic Lawnmower Boundary Wire Splice Kit a practical fix. It bundles a corrosion-resistant tin‑plated conductor, waterproof self‑stripping connectors, stakes, and enough wire to handle most small-to-medium repairs for about $13.99 — a straightforward, no‑nonsense way to repair or adapt mowing boundaries without unnecessary complexity.
Boundary Wire Splice Kit for Robotic Mowers

It provides a sensible balance of corrosion-resistant wire, waterproof connectors, and enough hardware to tackle common boundary fixes and small layout changes. For homeowners who need a practical, low-cost way to repair or adapt mowing boundaries, it covers almost every basic need without unnecessary complexity.
Weatherproof Boundary & Guide Wire Splice Connectors: DIY Husqvarna Automower Repair
Overview
This accessory set is built for people who need to repair, extend, or adapt the perimeter of a robotic lawnmower without calling a technician. It bundles a length of boundary wire with stakes and a handful of sealed connectors so the user can run, splice, or replace segments of a mower boundary quickly. The kit emphasizes weather resistance and straightforward connections: the conductor is tin-plated over an aluminum core and encased in a tough LLDPE jacket to withstand moisture and seasonal temperature swings.


What’s included and why it matters
These components are curated to let a homeowner complete common fixes: replace a chewed section, splice a cut, or run a short guide wire to guide the mower into a narrow opening. The self-stripping connectors eliminate the need for wire strippers or soldering irons, making field repairs feasible with only a small crimping tool or pliers.
Materials and build quality
The conductor is a tin-plated copper-plated aluminum strand that balances conductivity, flexibility, and cost. Tin plating improves the resistance to oxidation relative to bare aluminum. The outer LLDPE jacket offers abrasion resistance and stays reasonably flexible in cooler temperatures. The supplied stakes are molded plastic with a protruding hook to keep a single wire aligned at the turf surface.
The kit is designed around practicality rather than heavy-duty pro use. Stakes are adequate for most domestic lawns, but in very rocky or compacted soils a user may need longer metal or robust stakes.
Installation and practical tips
Before starting any changes, the user should plan the new boundary on paper or with a garden hose to visualize turns and narrow passages. A few practical steps make the job faster and last longer:


Compatibility and common use cases
This kit is broadly compatible with most consumer robotic lawnmowers that use a buried or pinned boundary wire system; the conductor size and insulation are typical of many factory-supplied perimeter cables. Typical use cases include:
A quick compatibility check is to compare the existing wire’s diameter and conductor type; if the new wire matches size and insulation properties, it will read correctly on the mower’s perimeter signal.
Performance in real conditions
In well-maintained lawns the wire remains largely hidden within a week as grass regrows. The silicone-sealed connectors perform well when buried at shallow depth or left on top of turf under a small mound of soil; their heat and moisture ratings reduce the risk of corrosion over a few seasons. The plastic stakes are fine for easy-to-penetrate soils; in compacted or heavily trafficked lawns users may prefer longer stainless pins or heavier anchors.
| Attribute | Expectation |
|---|---|
| Weather tolerance | Good for rain and frost; connectors rated to 105°C |
| Longevity | Several seasons with typical lawn care |
| Ease of field repair | High — minimal tools required |
| Best soil type for stakes | Loam, turf, and well-drained topsoil |
Maintenance and troubleshooting
For a lasting installation, inspect the perimeter wire annually after winter thaw and after any heavy landscaping work. If mower boundary detection becomes intermittent, follow these steps:


When to choose an alternative
This kit is a practical choice for homeowners handling routine repairs or small adaptation projects. Consider upgrading if any of the following apply:
Bottom line
The product is a pragmatic, cost-effective solution for common robotic mower boundary tasks. It prioritizes weather resistance and ease of connection over professional-grade anchoring hardware, making it a strong choice for the majority of residential use cases where speed and simplicity matter.
FAQ
Most consumer robotic mowers accept a direct connection to boundary wire with the same conductor size and insulation type. The user should check the mower manufacturer’s manual for recommended wire diameter and connector type. If the mower requires a specific plug or heavier gauge, an adapter or different wire may be necessary.
For routine installations the wire is typically buried a couple of inches beneath the soil or held on top and weighted with sod — connectors can be placed shallow and covered with soil. The important part is avoiding mechanical strain on joints and protecting connectors from frequent digging or lawn aeration equipment.
The connectors use silicone gel seals and heat-resistant insulating materials rated up to 105°C, which offers excellent protection against moisture ingress for seasonal exposure. For long-term permanence, burying the sealed connector under a modest layer of soil or turf improves longevity and reduces UV exposure.
If a stake head breaks, it can be replaced with a slightly longer or sturdier stake available at garden centers. Alternatively, the user can hand-bury that section of wire a little deeper until a replacement stake is obtained. When installing, tap stakes gently and avoid hammering too hard on plastic heads.
It’s best to keep a small separation between perimeter wire and other electrical or irrigation lines to prevent electromagnetic interference and accidental damage from maintenance. If they must cross, do so at a 90-degree angle and secure both runs separately.
Yes. The combination of clip connectors and self-stripping waterproof connectors makes it straightforward to try different boundary shapes during spring and summer and then finalize the layout with buried sealed connectors once satisfied.


Neutral take: Kit does what it says, but the instructions are a bit basic. A small diagram showing the splice order would have helped.
Pros: Affordable, connectors seem waterproof.
Cons: No clear guide for different wire sizes, and the little green color makes them hard to spot in grass if you need to find them later.
Thanks for the candid feedback, Sarah. I’ll suggest adding a simple wiring diagram to the article — that should help visual learners.
Agree on the color issue. I marked the splice spots with small flag markers so I could find them later.
Good idea, Priya. I’ll try flags next time.
I installed this for a friend who has an oddly shaped yard.
It was really straightforward: the connectors clicked, the wire seems sturdy, and the kit had extras so we didn’t run out. The waterproofing seemed legit — no corrosion after a month of rain. The price is great for what you get.
Couple of notes:
– Wear gloves for the digging parts.
– Keep the little metal crimps; you’ll need them for a tight connection.
Overall: recommended for quick repairs or minor layout changes.
Good point about the crimps — I always use a proper crimper, not pliers, to avoid a loose connection.
How deep did you bury the splice? I’m nervous about mower blades hitting it.
Thanks for the detailed rundown, Priya. The extras can make the difference in small jobs like that.
Fixed my ‘invisible fence’ like a pro. Took 20 minutes including coffee break. If your mower acts possessed after splicing, double-check polarity (yes, even robotic mowers have mood swings). 😂
Had that happen — turned out I crossed two ends. Easy fix once you spot it, but it did make my mower try to escape the yard for a bit.
Polarity can matter with some setups — good reminder. Also check the loop continuity with a multimeter if the mower’s still acting odd.
A couple of practical tips from my last repair:
– Label the wire ends with tape before cutting so you don’t mix them up.
– Use a zip-tie to anchor the splice to a stake until the soil settles.
– Test the loop continuity before burying anything.
Saved me a second dig when I followed these steps. No photos here but I can describe layout patterns for oddly shaped yards if anyone wants suggestions.
Karen — sure. Try running the loop midway and use flags while testing. I’ll write a short layout note with measurements if you give me the yard width.
Great checklist, Daniel. Labeling is underrated — prevents accidental rework.
Would love layout suggestions for a narrow side yard — mine’s basically a skinny corridor.
Not a fan of the instructions — they assume you already know what you’re doing. I had to YouTube a tutorial to figure out the crimps and then improvise a seal. Also the kit didn’t come with wire strippers which felt stingy for a ‘repair kit’.
My experience (detailed because maybe it helps others):
1) The connectors are decent once crimped properly.
2) Waterproofing is okay but I added heat-shrink.
3) Took me longer than the article suggested because I underestimated prep.
If you’re a complete novice, budget an hour and watch a quick step-by-step video first. Don’t be like me, getting impatient and cutting corners — you’ll regret it!
Good call, Hannah. I’ll update the article to recommend a basic tool list (strippers, proper crimper, heat-shrink) for first-timers.
If you want to avoid buying tools for a single job, some hardware stores will crimp for you or loan a tool. Not ideal but an option.
Agreed on the tools. I keep a small kit in the garage for quick jobs: wire strippers, crimper, silicone, and some heat-shrink.
Heat-shrink is a game-changer — makes the splice feel professional and keeps moisture out.
Thanks for the tips — I’ll invest in a crimper for the next repair.
Price-wise this seems like a steal for $13.99. But can anyone comment on whether the kit includes enough wire for a slightly larger fix? I just need to reroute a corner by about 12–15 feet.
I bought an extra spool and had more than enough. The kit handled the connectors and extras, but not the full new length.
The kit is mainly splice/connectors and some short wire segments; it’s not meant as a full-length replacement. For a 12–15 ft reroute, you might need to buy additional boundary wire separately.
Thanks — I’ll pick up an extra spool then.
Short and sweet: worked fine. Be careful with the small parts — they’re easy to lose in the grass. 🙂
Small parts are the sneakiest. Keep them on a tray or small bowl when working outdoors.
I dropped a screw in the mulch and spent 10 minutes thinking it grew legs. Bring a magnet or a cup 😂
Just bought this splice kit after reading the article — nice little bundle for $13.99. Connectors felt solid and the included screws/fasteners were a nice touch. Saved me a weekend trip to the hardware store. 👍
Thanks for the tip, Emily. Did you need to strip much insulation off the wire or did the connectors handle it well?
I had to strip a couple mm for a clean contact, but the connectors clamped down tight. No issues so far.
Glad it saved you a trip, Emily! If you run into stubborn soil or roots, try loosening the area around the splice first — makes installation a lot easier.
Practical tip: when splicing, do it in a dry area and give the connector a small tug test before burying. A lot of ‘returns’ are from poor mechanical joints rather than corrosion.
Also, if you’re changing boundary shape, plan the loop path to avoid metal objects and sharp turns — those can stress the wire.
Good tip — I’ll try that this weekend.
You can use a flat spade or a narrow trenching tool to slip under pavers; sometimes running through adjacent grit/sand is easier than lifting stones.
Excellent practical advice, Marcus. Tug test is a must — prevents future headaches.
Thanks Marcus. Any suggestions for getting the wire under existing pavers without removing them?
Quick question for folks who’ve used it — does anyone know the gauge of the boundary wire? The product page is a little vague and I don’t want to splice a different size into my existing loop and risk resistance issues.
Also, the review mentions corrosion-resistant wire. Has anyone used these in salty coastal environments? Curious how they hold up over a season. 😬
Good questions. The kit is aimed at common consumer mower boundaries (many are 16–18 AWG). If you have a very different gauge, it’s safer to match it. For coastal use, look for marine-grade crimps or add some extra sealant; the kit’s waterproofing is decent but extra protection helps.
Thanks all — I’ll grab silicone tape just in case. Multimeter trick is handy, Marcus.
I used these near the coast for one summer. They held up okay but I wrapped the splices with silicone tape as extra insurance — no rust after 10 months.
If you want to measure resistance quickly: use a multimeter across a known length of your existing wire to estimate gauge. Saves buying the wrong kit.