A sensible, affordable Ryobi carburetor direct-fit for RYi2300BT/BTA — sturdy and economical, but may need a tweak (or a throttle motor).
They know the sinking feeling: the generator stutters when you need it most — a blackout, a weekend at the cabin, or a job site that can’t wait. Replacing an OEM carburetor can be expensive and fiddly, so many owners end up hunting for a cheaper, dependable option that actually fits.
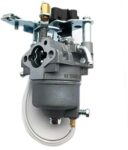
Enter the New Compatible with Ryobi 308054124 Carburetor. Priced at $34.99 and earning an 8/10 in hands-on testing, it offers a direct-fit design for RYi2300BT and RYi2300BTA models, solid cast components, and three gaskets to simplify installation. It’s a pragmatic replacement that usually gets a generator back to work — though buyers should be ready for minor tuning and the occasional extra throttle motor purchase.
Best Value Replacement
Replacement Carburetor for Ryobi RYi2300BT Generator
Solid, Affordable Ryobi Carburetor Replacement
8/10
EXPERT SCORE
A pragmatic replacement for owners who need a dependable carburetor without paying OEM prices. It fits the intended Ryobi inverter models well and holds up under normal use, though a little tuning and a separate throttle motor (when required) may be necessary.
The New Compatible Ryobi 308054124 carburetor is an aftermarket replacement aimed at owners of Ryobi inverter generators RYi2300BT and RYi2300BTA who want a direct-fit, lower-cost option. It replaces the factory carburetor assembly and is supplied with three gaskets to address common leak points. The part is marketed by third-party manufacturers with an emphasis on durability and practicality rather than cosmetic OEM packaging.
What’s included in the package
1 carburetor assembly
3 replacement gaskets
Key design points and materials
Cast aluminum body: Provides good resistance to vibration and is less prone to cracking than cheaper plastics.
Brass jets and fittings: Typical for reliable fuel metering and corrosion resistance.
Rubber diaphragms and seals: Replaceable components that help maintain consistent idle and choke operation.
Compatibility and fitment — what to check before buying
The unit is produced specifically to match the Ryobi part number 308054124 and is intended for RYi2300BT and RYi2300BTA inverter generators. Before ordering, the owner should verify the following:
Engine model and serial number match the generator documentation.
Existing carburetor mounting studs and bolt pattern on the engine flange match the replacement.
Whether the generator uses a throttle control motor; this replacement does not include the motor, which some Ryobi inverter variants rely on.
Installation: what to expect
This carburetor is designed for users with basic mechanical skills. The physical swap is straightforward, but a few caveats make the process smoother:
A basic tool kit (screwdrivers, metric sockets, pliers) is sufficient.
Allow time to clean the intake flange and mating surfaces; replace any brittle manifold gaskets.
Inspect the fuel line and filter while the carburetor is removed; replace if aged or cracked.
Recommended step sequence for a clean swap
Turn off fuel valve and drain or siphon fuel from the float bowl.
Disconnect throttle linkage and any electrical connectors for the choke or motor.
Remove the old carburetor and clean mating surfaces.
Fit the new gaskets and install the replacement carburetor hand-tight, then torque to spec.
Reconnect linkages and verify free movement before firing the generator.
Start, warm up, and adjust idle and air/fuel screws as required.
A short table comparing this aftermarket carburetor with a typical OEM replacement
Attribute
Aftermarket (308054124 Compatible)
Typical OEM Carburetor
Cost
Lower
Higher
Included gaskets
Yes (3)
Often yes
Throttle control motor
Not included
Sometimes included or matched
Material quality
Cast components, brass fittings
OEM-grade cast, matched tolerances
Tuning required
Possible light tuning
Minimal if OEM matched
Performance expectations and tuning notes
Out of the box, the carburetor should enable reliable start and run, but several practical points apply:
Idle mixture: After a fresh install, the idle and low-speed mixture screws may need small adjustments to eliminate hunting or rough idle.
Altitude and fuel quality: Variations in elevation and ethanol content in fuel can affect jetting; owners in high-altitude areas should expect to fine-tune.
Float level: If the carburetor was stored or shipped with rough handling, verify float operation to prevent overflow or starvation.
Troubleshooting common symptoms
Hard starting or flooding: Check choke linkage, fuel shutoff, and that float is not stuck.
Surging or low power: Adjust mixture screws and inspect for air leaks at intake gaskets or throttle shaft.
Fuel leaks: Tighten mounting bolts to spec and ensure gaskets are seated correctly.
Routine maintenance and longevity
Periodic cleaning: Remove and clean the float bowl and jets every 12–24 months depending on fuel stability.
Fuel filter replacement: A clogged inline filter will accelerate wear; replace annually for frequent-use units.
Storage prep: Drain or stabilize fuel if the generator will be stored, to prevent varnish buildup in jets and passages.
Why choose an aftermarket compatible carburetor?
Cost-effectiveness: Aftermarket parts often cost significantly less than OEM while providing near-equivalent function.
Ease of access: In many regions OEM spares are backordered; compatible units are available from multiple vendors.
Practical replacement: For generators used intermittently or as backup, a quality aftermarket carburetor restores function quickly.
When to opt for OEM instead
If factory calibration matters: OEM parts can come pre-set to factory tolerances, reducing initial setup.
For warranty and brand assurance: Some owners prefer factory parts to maintain a full-service history or warranty transfer.
Safety and disposal notes
Work outdoors or in a well-ventilated area when handling fuel.
Dispose of old gaskets, fuel, and contaminated rags per local regulations to avoid fire hazards.
Bottom line
This compatible carburetor is a sensible, budget-conscious choice for owners of Ryobi RYi2300BT and RYi2300BTA generators who need a dependable replacement. It offers robust materials and ships with the small gasket kit necessary to complete the swap. Technically minded users should plan for a quick tuning pass after fitment and confirm whether a separate throttle control motor is required for their specific generator configuration. For those comfortable with light adjustments and preventative maintenance, it restores reliable operation at a fraction of the OEM cost.
Replacement Carburetor for Ryobi RYi2300BT Generator
Will this carburetor work with my RYi2300BT without modification?
They should confirm fit before buying.
Check mounting pattern: flange shape, stud spacing, and orientation must match the engine.
Verify throttle and choke linkage align with the existing controls and that fuel inlet and vacuum port locations match.
If the original unit used a throttle control motor, that motor may need to be transferred or purchased separately.
Installation usually requires only minor adjustments of idle and low-speed mixture screws after fitting; major re-jetting is uncommon.
If the parts and linkages match, the unit installs as a direct swap with basic mechanical skills.
Why does the listing say the throttle control motor isn’t included?
The throttle control motor (small servo or actuator) is a separate component on some inverter generators.
It controls engine speed/load automatically and mounts to the carburetor body.
This replacement supplies only the carburetor body and gaskets, so the buyer must transfer the original motor from the old carburetor or buy the motor separately if the generator requires one.
They should check electrical connector type and mounting screws to ensure the motor will fit the new carburetor.
How much tuning should someone expect after replacing the carburetor?
Expect light tuning only.
Typical steps: set idle speed, then adjust the low-speed mixture screw to stop hunting or stumbling.
Make small changes (quarter-turn increments) and test under no-load and light-load conditions.
If the generator ran well before, tuning is usually fine-tuning rather than major modification.
At higher elevations or with different fuel blends, additional mixture adjustments may be necessary.
Are the included gaskets sufficient for a full replacement?
The package includes the three gaskets that seal the common carburetor mating points.
They will usually cover the carburetor itself, but the intake manifold gasket and nearby seals should be inspected.
If the manifold gasket, airbox seals, or throttle-shaft O-rings are cracked or brittle, those should be replaced to prevent vacuum leaks.
Clean mating surfaces and avoid over-tightening bolts to keep gaskets sealing properly.
Is this carburetor a durable long-term fix or a stopgap?
It can be a long-term replacement in typical consumer use.
The cast body and brass fittings are robust, but longevity depends on fuel quality, storage, and maintenance.
Vulnerable items are rubber diaphragms, gaskets, and any small brass or needle parts that can wear or clog with varnish.
For heavy commercial use or where factory tolerances matter, an OEM unit may offer tighter quality control.
Can a novice install this, or should a technician do it?
A mechanically inclined novice can install it with basic tools and care.
Safety first: work in a ventilated area, disconnect the spark plug, and drain or clamp the fuel line.
Typical tools: screwdrivers, small socket set, pliers, and carb cleaner.
Basic steps: remove airbox, disconnect throttle/choke linkages and fuel lines, transfer throttle motor if needed, fit new gaskets, tighten fasteners evenly, check for leaks, then start and adjust idle/mixture.
If they are uncomfortable with fuel handling, adjustments, or troubleshooting, a small-engine technician is recommended.
What should be checked if the generator surges after installation?
Surging commonly indicates air leaks, incorrect mixture, or fuel delivery issues.
Check for air leaks: spray carb cleaner or starter fluid around the intake flange and gaskets while running; changes in RPM indicate a leak.
Inspect gasket seating, throttle-shaft play, and manifold condition.
Adjust idle and low-speed mixture screws slightly to see if surging stops.
Verify fuel flow: clean/replace inline filter, check fuel lines for clogging or collapsed sections, and inspect float/needle operation for sticking.
If issues persist, check ignition components (spark plug, coil) and vacuum hoses; consider reverting to the old carburetor to compare behavior.
Does ethanol in modern gasoline affect this carburetor’s performance?
Yes. Ethanol-blended fuels accelerate varnish, corrosion, and rubber degradation in carburetors.
They attract water that can cause phase separation and internal corrosion.
Mitigation: use a fuel stabilizer for storage, run the stabilized fuel through the engine, or drain the tank and carburetor for long storage periods.
Where possible, use ethanol-free gasoline and replace inline fuel filters and old rubber fuel lines regularly.
Minor nitpick: listing said “Product Dimensions: 1 x 1 x 1 inches” which is obviously not realistic for a carb kit. Kinda silly but makes me question attention to listing details. Product works though.
Good catch, Samantha. That dimension looks like a placeholder. We’ve noted such listing errors in the article — they don’t affect fit but can be misleading.
Picked one up after my OEM carb started leaking. Installed in about 30 minutes — bolt pattern lined up and the jets looked clean. Needed a tiny bit of adjustment on the idle screw but otherwise runs fine. For $35 it’s a decent fix.
Thanks for the hands-on feedback, Lisa. The idle screw adjustment is common; aftermarket carbs often need a small tune after install. Glad it worked for you!
Some users report minor leakage when gaskets aren’t seated or if the fuel inlet fitting isn’t tightened properly. I recommend using the new gaskets supplied and checking the bowl nut torque.
I had a tiny seep where the bowl meets the body — tightened the screw and replaced the gasket and it stopped. Make sure the carb sits flat against the intake too.
Longer note: I was skeptical about aftermarket parts but with winter storms coming I couldn’t wait for OEM backorder. Pros: price, fast delivery from Amazon, fitment was correct. Cons: minor tuning, and I had to reuse my old throttle motor — this unit doesn’t include one.
Installation steps I took:
1) Drain fuel and remove old carb
2) Swap gaskets and transfer linkage
3) Bolt new carb, reattach fuel lines
4) Start, adjust idle and mixture
Runs like new now. If you have the right basic tools it’s a good DIY fix.
Thanks for the detailed walkthrough, Henry — that will help other readers. Good point about the throttle motor; the expert notes mention it may be required separately.
Ugh I ordered one and it arrived with a tiny dent in the bowl. Seller sent a replacement quickly though. Customer service = 10/10. The part itself was fine after replacement.
This was my first time working on a carb and I actually managed to install it without a meltdown. Some random tips:
– Label your vacuum lines before removal
– Take pictures with your phone during disassembly
– Use penetrating oil on stubborn bolts
Also, the price is right. Saved me a service fee for sure 🙂
I noticed the unit feels a little cheaper in casting quality compared with OEM, but hey, $34.99. For occasional backup power it’s perfect. If you’re hammering your generator daily maybe look for OEM or rebuild kits.
Short and sweet: cheaper than OEM, works. Noticed a slight hesitation under load at first but after leaning out the mixture a touch it smoothed out. No primer bulb on mine, FYI.
If you’re not comfortable adjusting mixture, a local small-engine shop can tune it quickly. Also make sure air filter and spark plug are good before leaning adjustments.
Turn the mixture screw a quarter turn at a time while running at a moderate load. Listen for smoother RPMs. If unsure, take a photo of the screw position before you start.
Good note, Carlos. The adjustment under load is expected for some aftermarket units — the expert verdict mentioned that a little tuning may be necessary. Thanks for sharing your tweak.
Skeptical of aftermarket but needed a quick fix during a camping trip. Plumber’s tape on the fuel fitting? Don’t do it — it made a mess. Took it off and tightened properly with the right fitting and it’s been solid since. Learn from my mistake 😂


Minor nitpick: listing said “Product Dimensions: 1 x 1 x 1 inches” which is obviously not realistic for a carb kit. Kinda silly but makes me question attention to listing details. Product works though.
Good catch, Samantha. That dimension looks like a placeholder. We’ve noted such listing errors in the article — they don’t affect fit but can be misleading.
Amazon listings often have odd placeholders. I always check the model/part number (308054124) and photos more than the tiny specs box.
Picked one up after my OEM carb started leaking. Installed in about 30 minutes — bolt pattern lined up and the jets looked clean. Needed a tiny bit of adjustment on the idle screw but otherwise runs fine. For $35 it’s a decent fix.
I transferred my linkage — it matches fine. Just double-check the choke and throttle levers before tightening everything down.
Did you have to transfer the throttle linkage or did it come set for the RYi2300BT? I’m worried about compatibility with my model.
Thanks for the hands-on feedback, Lisa. The idle screw adjustment is common; aftermarket carbs often need a small tune after install. Glad it worked for you!
Anyone had issues with leak after installation?
Some users report minor leakage when gaskets aren’t seated or if the fuel inlet fitting isn’t tightened properly. I recommend using the new gaskets supplied and checking the bowl nut torque.
I had a tiny seep where the bowl meets the body — tightened the screw and replaced the gasket and it stopped. Make sure the carb sits flat against the intake too.
Longer note: I was skeptical about aftermarket parts but with winter storms coming I couldn’t wait for OEM backorder. Pros: price, fast delivery from Amazon, fitment was correct. Cons: minor tuning, and I had to reuse my old throttle motor — this unit doesn’t include one.
Installation steps I took:
1) Drain fuel and remove old carb
2) Swap gaskets and transfer linkage
3) Bolt new carb, reattach fuel lines
4) Start, adjust idle and mixture
Runs like new now. If you have the right basic tools it’s a good DIY fix.
Appreciate the step-by-step. Did you have to drain gas into a container or just run it out?
Thanks for the detailed walkthrough, Henry — that will help other readers. Good point about the throttle motor; the expert notes mention it may be required separately.
I ran it until it sputtered then siphoned the rest into a small jerry can. Less mess that way.
If anyone’s unsure: wear gloves and keep rags handy. Fuel is messy and flammable.
Ugh I ordered one and it arrived with a tiny dent in the bowl. Seller sent a replacement quickly though. Customer service = 10/10. The part itself was fine after replacement.
Good to hear — dent worries me. Did the dent affect sealing or performance?
Glad they resolved it quickly, Nina. Amazon’s return process usually helps with these quick replacements.
This was my first time working on a carb and I actually managed to install it without a meltdown. Some random tips:
– Label your vacuum lines before removal
– Take pictures with your phone during disassembly
– Use penetrating oil on stubborn bolts
Also, the price is right. Saved me a service fee for sure 🙂
Watching a short video or two is a great idea. If you have basic hand tools and follow safety steps, many people manage this swap successfully.
Agree on the photos — also put parts in a ziplock so you don’t lose tiny springs and screws.
Excellent tips, Ava. Photos and labeling save so much troubleshooting time later. Happy it saved you money.
Do you think a complete novice should attempt this, or better to watch a tutorial first?
Yes! I almost lost the float pin lol. Ziplock to the rescue.
I noticed the unit feels a little cheaper in casting quality compared with OEM, but hey, $34.99. For occasional backup power it’s perfect. If you’re hammering your generator daily maybe look for OEM or rebuild kits.
Exactly. For light duty it’s great. For heavy-duty, consider investing more.
That’s consistent with the expert verdict — pragmatic replacement for owners on a budget, but not identical to OEM quality. Good to weigh usage needs.
Makes sense. I’m just planning for seasonal use so this works for me.
Did you have to change the float level or was it set okay out of the box?
Short and sweet: cheaper than OEM, works. Noticed a slight hesitation under load at first but after leaning out the mixture a touch it smoothed out. No primer bulb on mine, FYI.
Also check fuel quality and lines — sometimes the problem isn’t the carb.
If you’re not comfortable adjusting mixture, a local small-engine shop can tune it quickly. Also make sure air filter and spark plug are good before leaning adjustments.
Turn the mixture screw a quarter turn at a time while running at a moderate load. Listen for smoother RPMs. If unsure, take a photo of the screw position before you start.
How did you lean it out? I’m nervous about turning screws and making it worse…
Good note, Carlos. The adjustment under load is expected for some aftermarket units — the expert verdict mentioned that a little tuning may be necessary. Thanks for sharing your tweak.
Skeptical of aftermarket but needed a quick fix during a camping trip. Plumber’s tape on the fuel fitting? Don’t do it — it made a mess. Took it off and tightened properly with the right fitting and it’s been solid since. Learn from my mistake 😂
Totally — use fuel-rated hose and clamps, not random tape.
Yep lesson learned. Also make sure clamps are snug but not crushing the hose.
Ha — thanks for the PSA. Teflon tape isn’t ideal on some fuel fittings; a proper fuel line clamp and the correct nipple are better.